




Editor's Note: This is a review post about the ROKR Leonardo da Vinci's Helicopter, originally posted by Austin 3DPuzzle Lab on YouTube. We have compiled and summarized the contents mentioned in the video to objectively and impartially review this product for everyone.
Quick Verdict
Yes, a 10-year-old can build the ROKR Leonardo da Vinci’s Helicopter. Austin, the 10-year-old builder behind Austin 3DPuzzle Lab, completed the model and successfully brought its six-cylinder engine, pistons, and gears to life.
However, this is not an effortless beginner build. Younger builders need patience, careful organization, and close attention to the instructions. Some may also need occasional adult assistance with tight-fitting parts, small screws, and gear alignment.
For children who already have some model-building experience, it is a challenging but manageable STEM project with a particularly satisfying mechanical result.
In this review, we follow Austin’s experience from unboxing the kit and constructing its radial engine to switching on the finished mechanism.
About the ROKR Leonardo da Vinci’s Helicopter
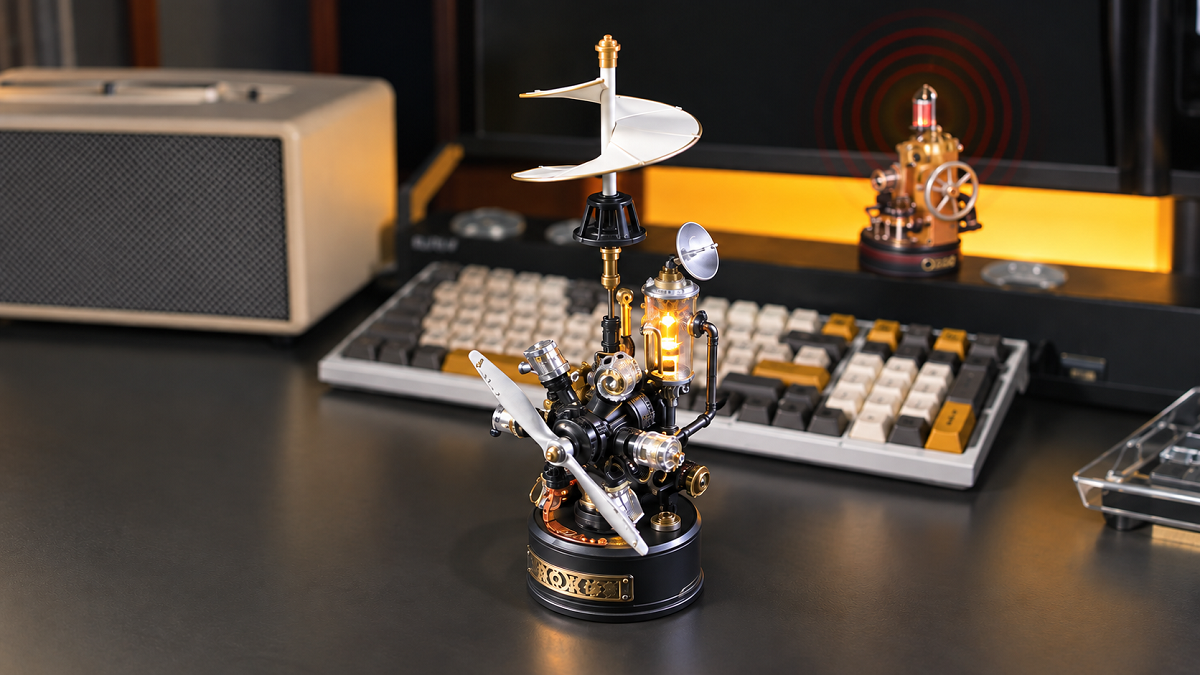
The ROKR Leonardo da Vinci’s Helicopter CGL01 is inspired by Leonardo da Vinci’s aerial screw—an early flying-machine concept based on the idea of generating vertical lift through rotational motion.

Rather than reproducing the original sketch as a static historical model, ROKR reimagines it as an industrial-style mechanical machine. Its exposed structure includes a six-cylinder radial engine, moving pistons, transmission gears, a double-helix rotor, and an illuminated mechanical core.
The model is part of ROKR’s Industrial City Series. It can operate independently or connect with compatible models from the same collection through a shared hub or wired track system.
Product Details
- Product name: ROKR Leonardo da Vinci’s Helicopter
- Model number: CGL01
- Number of pieces: 154
- Estimated assembly time: Approximately 3 hours
- Difficulty level: ★★★☆☆
- Material: Plastic
- Recommended age: 8+
- Assembled size: 4.4 × 3.7 × 10 inches (11.1 × 9.4 × 25.5 cm)
- Power options: Independent Type-C power or compatible Industrial City linkage
- Main mechanism: Six-cylinder radial engine with visible transmission gears
What Comes in the Box?
Austin begins by removing the outer packaging and laying out the contents. His immediate reaction is that the kit contains a surprisingly large number of components for a model with such a compact footprint.
Inside are several labeled part frames, screws, rubber transmission components, lubricant, applicators, and basic assembly tools. Austin examines and organizes the different pieces before starting the first stage.
This preparation is particularly helpful because several similar-looking components appear throughout the build. The six-cylinder engine also requires repeated parts, so keeping the frames grouped by their labels makes it easier to find the correct pieces.
Austin occasionally pauses to work out what a component is or where it will be used. This is understandable in a mechanical kit where the purpose of an individual part may not become clear until it connects to the larger system.
Austin’s Assembly Experience
Starting With the Central Engine
Austin begins with the central structure of the engine. Some of the first connections are quite tight, and one early step proves more difficult than expected.
Instead of continuing to apply force, he checks the instructions and adjusts his approach until the components lock into place. This is an important lesson for younger builders: if a part does not fit immediately, it is usually better to check its orientation before pushing harder.
The unfinished mechanism is not completely stable at this point, which makes it difficult to test. As more supporting pieces are installed, however, the structure becomes secure enough for Austin to rotate and inspect.
At approximately 13 minutes into the video, the first recognizable section of the six-cylinder engine begins to take shape.
Building the Six Pistons
The radial engine is the centerpiece of the model and the most educational part of the assembly.

Austin first constructs one piston unit and tests its movement. Once he understands the basic structure, he repeats the process five more times to complete all six cylinders.
He develops an efficient approach by gathering the necessary pieces before starting the repeated assemblies. Some components also need to be cleaned after being removed from their frames, so he carefully scrapes away small remnants from the connection points.
This preparation helps the parts fit together more smoothly and reduces the temptation to force a connection.
After completing each piston, Austin checks that it can move. He then installs the units around the central assembly one by one. With every new cylinder, the radial engine becomes more mechanically impressive.
Once all six pistons are attached, Austin rotates the mechanism and confirms that they move together. The visible motion makes it easier to understand how rotation can drive multiple pistons in sequence.
Checking the Material Quality
While working on the engine housing, Austin comments positively on the plastic components. He describes them as strong and appreciates the amount of molded detail.
This model differs from the laser-cut wooden kits for which ROKR is widely known. Its plastic construction allows for curved industrial shapes, transparent components, and smaller mechanical details that complement its metallic appearance.
The material also appears capable of handling the repeated fitting and testing involved in the build. Austin adjusts and reconnects several pieces without reporting any significant material failure.
Securing and Testing the Engine
After the pistons are installed, Austin adds the surrounding housing and secures it with screws. Although some of the engine becomes less visible behind the exterior structure, its movement can still be observed through the model’s open mechanical design.

Before proceeding, he tests the assembly again. The engine operates as intended, prompting him to say:
“It’s working perfectly.”
Testing the mechanism at this stage is a good decision. If one of the pistons were misaligned, it would be easier to correct before more gears and exterior components were installed.
Installing the Gears and Transmission
The next stage introduces the gears and transmission components that transfer movement through the model.
This portion demands closer attention to orientation. Austin frequently returns to the instructions to confirm which direction a gear or connector should face. He also examines the mechanism to understand how one gear engages with another.
As the transmission develops, the model begins to demonstrate more than simple rotation. The lower and upper gears connect different parts of the machine, creating a visible chain of mechanical movement.
Some components are small or difficult to identify before installation. At one point, Austin is unsure what a flexible piece is supposed to do. Its purpose becomes clearer later when it connects with the lighting and mechanical structure.
During one delicate stage, Austin gives a simple but useful warning:
“Be very careful with this one.”
That advice applies broadly to the gear assembly. If a piece feels unusually resistant, builders should confirm its number and orientation before pressing it into position.
Adding the Lights and Exterior Details
The helicopter includes an illuminated industrial core that adds warmth to its metallic, steampunk-inspired appearance.

Austin tests the light before the structure is fully enclosed. Once powered, the flexible illuminated component produces a yellow glow inside the model, making the internal machinery more dramatic when displayed.
Testing the electronic components before installing the final exterior pieces is a sensible precaution. If a connector is loose or incorrectly positioned, it is much easier to fix while the surrounding parts remain accessible.
Austin then continues building the lower structure, exterior supports, pipes, handrails, and rotor assembly. As these details are added, the collection of separate mechanisms begins to resemble the completed helicopter.
The Final Mechanical Test
Near the end of the build, Austin presses the remaining components into place and listens for the clicks that indicate secure connections.
When the model is powered, the mechanical system moves successfully. The pistons operate, the gears rotate, and motion travels through the connected sections. Austin points out the visible gears and shows how they drive the mechanism.
The result is especially satisfying because the video follows the engine from its first individual piston to the completed six-cylinder assembly. Viewers can see how the final movement is produced by the mechanical relationships built throughout the project.
Austin also reads an operational note from the instructions. After startup, the product can run continuously for approximately 20 minutes before stopping automatically. If the system detects a fault, it stops operating and an indicator light flashes. The instructions recommend keeping the included tools for future maintenance.
What Younger Builders Should Know
Although Austin completes the model successfully, several stages require extra patience.
Some connections are tight, and the six piston assemblies must be repeated carefully. The gears also need to be installed in the correct orientation for the transmission to move smoothly. Cleaning the connection points and testing the mechanism after each major stage can help prevent problems later.
The official recommended age is 8+, but experience matters as much as age. A child who has already completed mechanical models may be able to handle most of the project independently, while a first-time builder may need help with tight fittings, small screws, or troubleshooting.
Younger builders should keep the following points in mind:
- Organize the labeled part frames before starting.
- Clean the connection points after removing pieces from their frames.
- Complete the repeated piston units in the same sequence.
- Check each gear’s orientation before pressing it into place.
- Test the engine after every major assembly stage.
- Avoid forcing any component that does not move smoothly.
- Test the light while its connector is still accessible.
- Keep the supplied tools for later adjustments or maintenance.
Austin’s approach demonstrates the habits that make a complex kit manageable: work slowly, check the instructions, test each mechanism, and stop to investigate when something does not immediately make sense.
Final Verdict
The model stands out for its visible six-cylinder mechanism, detailed plastic construction, illuminated core, and satisfying final movement. Its main challenges are the tight-fitting parts, repeated piston assemblies, and careful gear alignment required during the build.
Austin’s experience shows that a patient and experienced 10-year-old can complete the ROKR Leonardo da Vinci’s Helicopter. The project is not effortless, but its repeated assembly patterns and testable mechanisms make the challenge manageable.
The six-cylinder radial engine is the highlight. Constructing each piston individually and then watching all six move together gives the project genuine educational value. The exposed gears, transmission system, lights, and rotating structure turn that lesson into an impressive display model.
For young engineering enthusiasts, experienced puzzle builders, and collectors who enjoy visible mechanical movement, the ROKR Leonardo da Vinci’s Helicopter is a rewarding project. First-time young builders, however, may benefit from occasional adult assistance with tight connections and more complicated mechanical stages.


Robotime Creative Team
As Robotime's earliest audience and testers, they start from user needs and are dedicated to sharing stories and insights about the brand and its products.
Robotime is a creative lifestyle company dedicated to designing and developing 3D puzzles, toys, and wooden handicrafts. Subscribe to learn more.
Enjoy Robotime building guides and creative inspiration?
Add Robotime as a Preferred Source on Google to see more of our latest stories in Search.
 Add Robotime to your Preferred Sources
Robotime Creative Team
As Robotime's earliest audience and testers, they start from user needs and are dedicated to sharing stories and insights about the brand and its products.
Robotime is a creative lifestyle company dedicated to designing and developing 3D puzzles, toys, and wooden handicrafts. Subscribe to learn more.



Leave a comment
This site is protected by hCaptcha and the hCaptcha Privacy Policy and Terms of Service apply.