



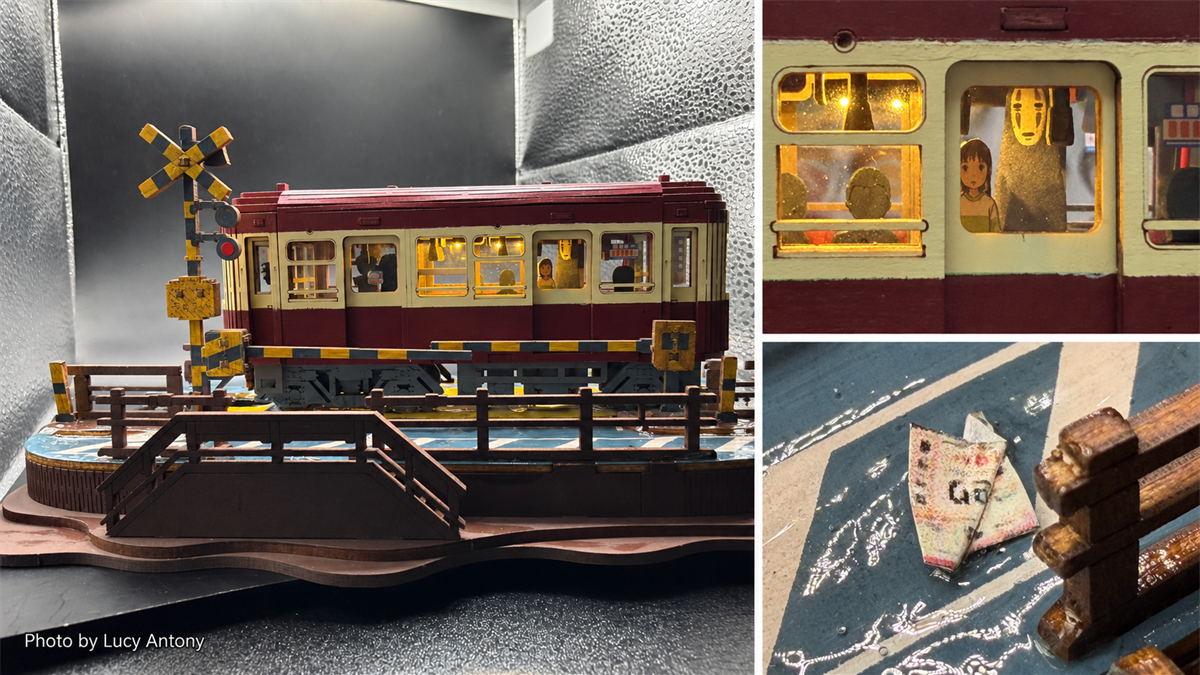
A maroon tram waits above a blue-gray tide. Its tracks disappear beneath rippling water, No-Face sits quietly among the passengers, and the familiar cherry-blossom stop has become something more mysterious: a miniature sea railway caught between departure and dream.
Robotime Community member Lucy Antony created the scene by transforming the Rolife Sakura Journey 3D Wooden Puzzle TGS02. Inspired by the unforgettable train sequence in Spirited Away, she changed the tram’s color, added Chihiro and No-Face, removed the original overhead elements, weathered the platform and covered the railway in layers of clear water gel.
What makes the project especially useful for other makers is the process behind the atmosphere. Lucy shared the build in stages—from the first passengers to the uncertain first coat of water—showing how a strong reference, careful testing and patient layering can turn a recognizable kit into a personal narrative.

Start with a scene, not a shopping list
Lucy’s first decision was conceptual rather than technical. She began with a particular feeling—the stillness and distance of a train moving across open water—and used that reference to decide what the model needed to become. That approach gave every later choice a purpose. The passengers would identify the story, the maroon body would shift the mood, and the base would need to read as a submerged railway rather than a dry station platform.
The earliest progress photo still shows the Sakura Journey in its original pale green, but Chihiro and No-Face are already visible through the windows. By adding the characters first, Lucy could test whether the idea was legible before committing to the most irreversible changes.


This is a useful way to plan a themed customization: identify two or three visual signals that make the reference recognizable, then let the rest of the build support them. A model does not need to reproduce every detail from its inspiration when the central cues are clear.
Connect color, light and character
Changing the tram from green to deep maroon did more than match a remembered vehicle. It also created a stronger contrast with the cool water and pale platform below. Warm light through the windows then brought attention back to the passengers and kept the darker carriage from feeling visually heavy.
Lucy tested the lighting before moving fully into the base work. That sequence matters. When a model includes internal illumination, testing it while the carriage is still easy to access reduces the risk of discovering a wiring or alignment problem after delicate scenery has been added.


The figures are small, but they are not incidental decoration. Chihiro and No-Face act as anchors: once they are visible, the altered color and water-covered tracks feel like parts of one story rather than separate experiments.
Build the water effect in patient layers
The water was the project’s most uncertain step. Lucy applied a gel that looked milky white when wet but dried clear, building it gradually across the base instead of trying to create the full depth in one application.
“I’ve been building it up slowly in sections, letting each one dry before deciding what needs more depth.”
Her progress record shows why that patience helped. The first application temporarily obscured the painted surface and tracks; later photographs reveal the dark rails and blue-gray base returning as the gel cleared. Lucy noted that each application took approximately 24 hours to dry, so the final depth came from repeated observation rather than a single pour.


The transferable lesson is not that every water product behaves identically. Drying time, clarity and shrinkage depend on the material and thickness. The lesson is to test the chosen medium, work in manageable areas and wait for the actual result before deciding whether the next layer is needed.
Let removal tell part of the story
Customization often focuses on what to add, but Lucy also changed the narrative by taking elements away. The official Sakura Journey scene includes cherry trees, an overhead line and a pantograph above the tram. Lucy removed the original overhead details and simplified the setting, allowing the long waterline, crossing signal and isolated carriage to dominate instead.
The remaining structures became more expressive because there were fewer competing elements. Painted ripples gather around the posts and platform edges. The dark rails emerge at the front, then vanish into the glossy surface. From lower angles, the tram appears less like a model displayed at a station and more like a vehicle paused along an improbable route.


“This was one of those builds where I had the idea before I knew whether it would actually work—particularly the water!”
That uncertainty is part of the finished project’s appeal. The scene feels convincing not because every choice was guaranteed, but because Lucy tested the risky parts, watched how the materials behaved and adjusted the composition around what worked.
Ideas to borrow for your own customization
A story-led conversion can begin with a modest plan. Choose one emotional reference, then identify the color, character or environmental feature that carries it most clearly. Mock up small additions before repainting. Test lighting while the model is still accessible. If a surface material changes as it cures, photograph each stage and let it dry fully before judging the next step. Finally, ask whether every original component still supports the new setting; removing one prominent feature may clarify the scene more effectively than adding several props.
Lucy’s project also demonstrates the value of documenting a build while it is unresolved. Her early posts preserve the original green tram, the first successful lighting test and the alarming white stage of the water gel. Together, those images make the final transformation more useful to other makers than a finished reveal alone.
You can follow the full progression in Lucy’s Robotime Community posts: the first passengers, the repaint and lighting update, the water-effect process, and the finished sea train.

Creative build and photography by Robotime Community member Lucy Antony. This project contains personal modifications and additional materials that are not included with the original Rolife Sakura Journey kit.


Robotime Creative Team
As Robotime's earliest audience and testers, they start from user needs and are dedicated to sharing stories and insights about the brand and its products.
Robotime is a creative lifestyle company dedicated to designing and developing 3D puzzles, toys, and wooden handicrafts. Subscribe to learn more.
Enjoy Robotime building guides and creative inspiration?
Add Robotime as a Preferred Source on Google to see more of our latest stories in Search.
 Add Robotime to your Preferred Sources
Robotime Creative Team
As Robotime's earliest audience and testers, they start from user needs and are dedicated to sharing stories and insights about the brand and its products.
Robotime is a creative lifestyle company dedicated to designing and developing 3D puzzles, toys, and wooden handicrafts. Subscribe to learn more.



Leave a comment
This site is protected by hCaptcha and the hCaptcha Privacy Policy and Terms of Service apply.