Editor's Note: This is a review post about the Rolife Falling Sakura Book Nook, originally posted by @buildingwiththeboys on YouTube. We have compiled and summarized the contents mentioned in the video to objectively and impartially review this product for everyone.
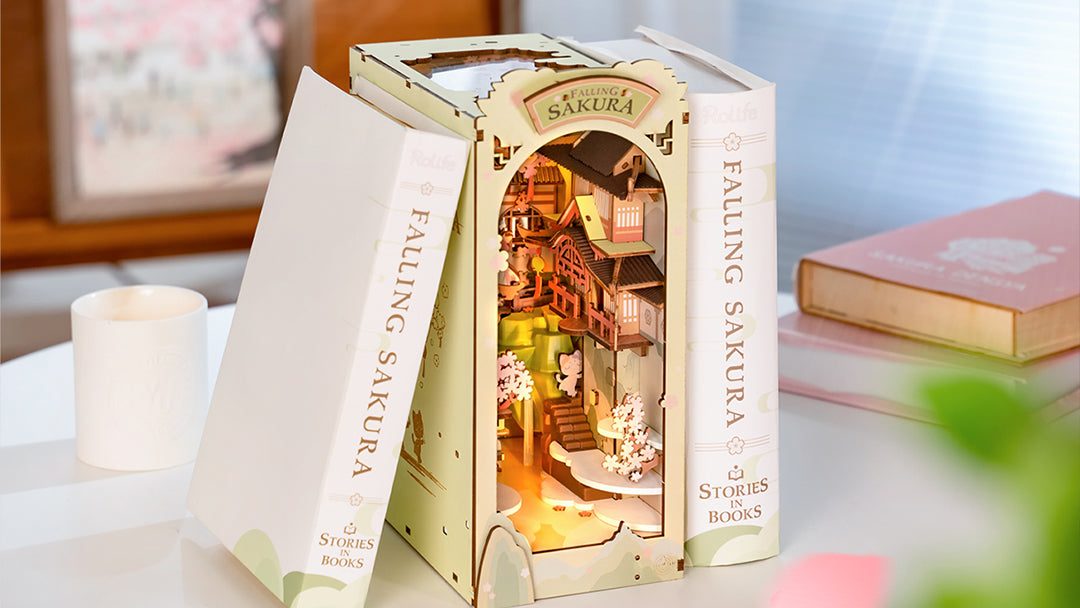
The Rolife Falling Sakura Book Nook Kit celebrates the beauty of springtime Japan. The cascades of cherry blossoms adorn the traditional pavilion as petals gracefully fall into the sparkling river that is set aglow by the light of the moon. In the midst of it all, an elegant lady stands with her eyes closed, relishing the smell of spring.
Details
- 240 pieces
- About 3 hours of assembly time
- Difficulty level: ★★★★
- Assembled size: H:9.8"(25cm) x W:4.3"(11cm) x D:7.5"(19cm)
- Free international shipping for orders over $65
- 30-day risk-free return policy
- Free parts replacement service
Features
- The built-in light replicates the moon while the LED strip at the bottom makes the river glow, giving the illusion of a moonlit river.
- The lanterns are cleverly designed to make it look like they’re swaying in the wind.
- The creative use of corrugated board on the roof tiles not only adds texture but makes them look like the real deal.
- It comes with detailed instructions with pictures to help with the assembly.
- The parts have been pre-colored and are precisely laser cut so they can be pushed to fit.
- The hard plastic elements add a new dimension to this 3D wooden puzzle.
Assembling the Sakura Densya Book Shelf Insert
In this section, I’ll be going through what I think are some of the difficult parts and hopefully help you have an easier time with this book nook kit.
Starting Off
For a nice, subtle start, I’ve pieced together the small branches as well as the larger one. It’s basically just attaching the cardboard sakura to the wooden branches using a few dabs of glue to hold them in place. I did the same for the plastic elements to the windows.
Then, I added the green rock plastic element to one of the side walls. There are two tabs to help hold it in place so the glue that comes with the kit should be enough for extra support. I really like this bit of a 3D effect that it gives. It’s something new that they’ve added to these newer kits.
Building the Pagoda and H1 Panel
Follow along as I build the pagoda. Remember not to force the parts in otherwise they might break. Once you get to the red archway part, you just slot it in the two remaining holes on the printed piece. It’s printed on both sides so it doesn’t matter which way it goes. This part feels thin and fragile so be very careful with it. The archway’s tabs should line up with the slots on E6 and E3 so you can snap them in place. D18 and D19 work as supports and are slotted on top of the archway and the front of the pagoda.
Next, install the roof with the little pieces with the lantern. This is a little tricky so you’ll need to be patient. Now, just add the E16 elements, the C-shaped ones, right in the front to create the fence.
Attach the part of the pagoda that you’ve assembled so far to the H1 backboard under the pagoda print by sliding the tabs in. Next, just attach the sides of the pagoda as well as the top with the plastic window we glued earlier.
For the roofing, just glue the corrugated board onto the blank roofs on the sides and top of the pagoda. Be careful not to press too hard so the boards don’t lose their corrugation.
It’s looking gorgeous so far and I love the color scheme with the red, green, and brown. Once you’ve added the rest of the elements like the clouds and sakura, you should be done with the H1 panel.
Assembling the Second Pagoda and Panel
Grab the panel where you added the green rock plastic element. Assemble the second pagoda on the right side of the green rock. They’re pushed to fit and very easy to do. Just follow the instructions in the manual until you’ve attached the corrugated roofing. Also, attach the stones underneath the pagoda and the sakura blossom branch on the left side of the pagoda.
The Falling Sakura has a cartoony edge or dreamy look to it compared to the other book nook kits that we’ve done before which have gone for more realism. Though, I think it still looks very lovely.
Connecting the Main Parts to the Baseboard
Slide in the tabs of the plastic base to the panel with the green rock plastic element to connect them. Then, grab the front frame and snap it onto the second panel’s top and bottom left tabs and the base’s corresponding tab. If yours is a tight fit as mine, you can pressure fit it with a pair of tweezers or gently sand it down with the sandpaper.
Next, glue in the cloud element on the base just under the second panel’s box construction. Get the stairs and slot the cat in. Apply some glue to the two tabs at the side of the stairs and slide the tabs into the slots just above the cloud. It’s a little hard to see, but it should be easy once you’ve lined them up perfectly.
Add the two other clouds above the stairs and some of the other sakura blossoms. There are dots on the base, marking where the sakura blossoms should go. So, you just need to add a pop of glue on them to attach the sakura blossoms on the base.
Attaching the Waterfalls
For the smaller part of the waterfall, there’s a slot on the base near the back of the stairs where it goes in. Then, you just need to push it a bit so it’s leaning against the rock and that’s where you’re going to glue it. The larger part of the waterfall requires some creative folding which you can see from the video. Then, you just slot it in the base around the sakura blossoms and use glue to hold it in place.
Working on the Mirror Board and Character
Remove the backing on the moon and glue it at the back of the mirror board. Once that’s dry, remove the film covering the mirror board and slot it in the base at the back of the green rock. Then, take the support, slot it in the back of the mirror board, and slightly push it forward.
For the character, follow the instructions as I have done in the video. You’ll be stacking pieces of wood on top of each other to give it some dimension. Then, add the girl to the first element you worked on.
Adding the Lights
Assemble the rounder bulb with parts D39 and D48 as shown in the instructions. Thread the wires in the hole in the tree as well as the hole in the mirror board, slotting the element with the girl in the green rock as you go. Now thread the wires into the hole on the base at the back of the mirror board.
Make the top cover with the vinyl sheet that you’ll be holding in place with pins from the D sheet. Attach it at the top, connecting the top cover to the front frame, side panel, and mirror board.
Attach the second bulb according to the instructions to the back piece and thread the wires into the hole. Set up the LED lights on the base panel and lock them in with the pins. Then, install the touch panel in the battery box and attach the base panel and battery box to this 3D wooden puzzle.
Remove the covers from the end of the red wires that you’ve threaded in the holes on the base panel. Line them up and twist the wires together. Do the same thing for the black wires. Tape down the wires so that they’re all secure and no live wires are exposed. Then, close it up with the panel.
Add the finishing touches on the front frame like the Falling Sakura name, and you’re done!
Conclusion
I really like the Rolife Falling Sakura. It’s gorgeous, especially with that glowing river. I was worried that they’d made this easier because of the complaints about complexity. Out of the five I’ve built so far, it’s definitely the easiest, particularly the wiring, which is red and black.
To be honest, I wasn’t expecting much from this 3D wooden puzzle, but it’s really nice. I don’t know if it’s my favorite book nook kit, but it could be. It’s beautiful and definitely worth buying. It’s great for beginners because the actual build itself isn’t overly complicated and the wiring is simpler. Overall, it’s an absolute winner.
Robotime is a creative lifestyle company dedicated to designing and developing 3D puzzles, toys, and wooden handicrafts. Subscribe to learn more.


Leave a comment
This site is protected by hCaptcha and the hCaptcha Privacy Policy and Terms of Service apply.