




Most Christmas centerpieces come out of a box and go back into one. What if yours came together piece by piece at your own table first? That is the fun of DIY Christmas table decorations. You enjoy the build, then you get to show off the result.
This guide covers 12 Robotime kits and the table each one suits best. Before you choose, think about three things that have nothing to do with measuring tape:
- Mood: Choose a cozy, playful or grand look and keep your kits in the same mood.
- Builder: Some builds are quick and some take longer, so match each to your time or build together.
- Story: Give each table one clear star, such as a village or a music box.
Once the mood and the story are settled, look at the room. A dining space guide from Room & Board suggests 18 to 24 inches of table width per person, which is a handy reminder that a display should never take space your guests need for eating. Every kit below shows where it fits best, which side to view it from, and what room its moving parts or cable will need. So let’s start!
Build a Mini Christmas Tree for Your Table
A small tree gives a table something to gather around. Pick one by how your table is used.
Rowood Everglow Christmas Tree TW05H is a softly glowing tree scene for crafters who love gentle, detailed decor. Its upright frame is made to be seen from the front, and its slim depth suits a console table. Stand it at the back like a framed picture, with a red plaid runner underneath, a short stack of Christmas books for height and a flameless pillar candle at each end like bookends. Your console becomes a mini gallery! Check the manual for its power steps before choosing the spot.

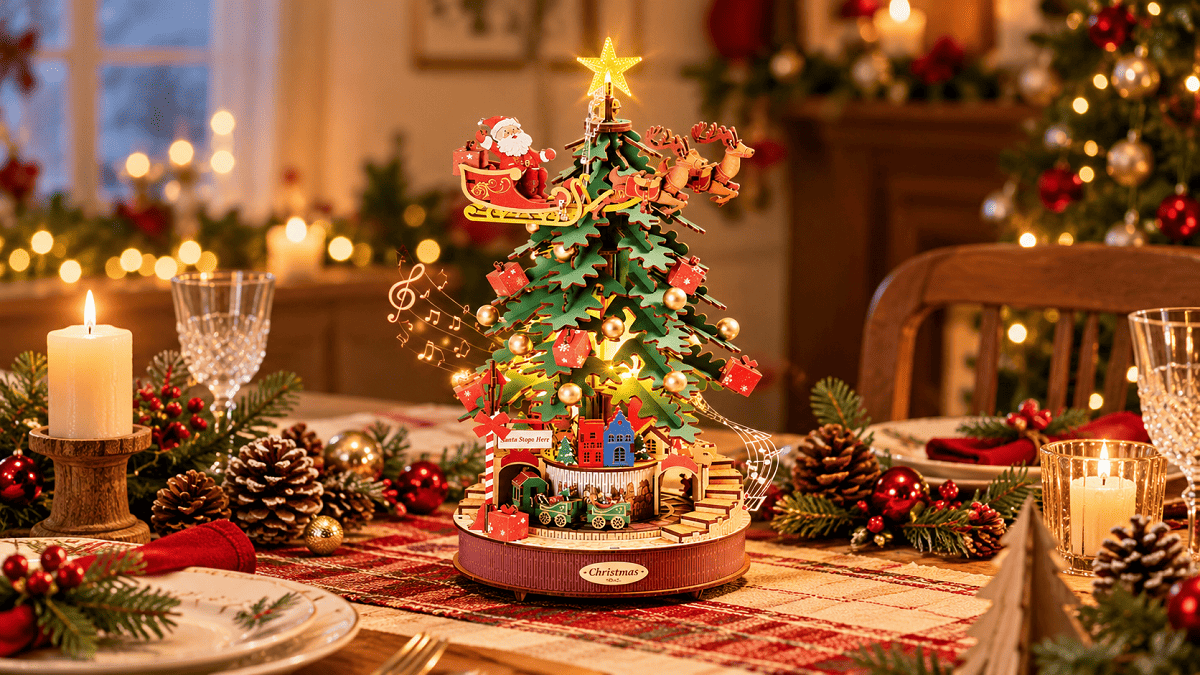
Rolife Christmas Melody Tree AMS01 is the showpiece of the group, a turning music box tree with Santa's sleigh above and a little train below! It suits builders who want a big centerpiece, and a large coffee table lets everyone enjoy it from their own seat as it turns. Set it on a round wooden tray with the Type-C cable tucked along the back edge, keep the sleigh's parking space open, and leave a bowl of baubles and pinecones to one side. Imagine guests watching it turn while the music plays!

Create a Miniature Christmas Village
A village looks best when a few small buildings stand together instead of one alone. Each of these three has its own job on the table, and together they tell a story!
Rolife Twinkling Christmas House DS036 is a snowy little house that opens to a warm living room, a real surprise on the table! It is small and friendly to build, so it suits beginners and family projects. Once built, place it on a coffee table facing the sofa, with a few free inches in front so the front can open. A real mug of cocoa beside it echoes the cocoa table inside, and a miniature tree on the other side finishes the scene. It runs on batteries, so no cable is needed.

Rolife Polaris Post DG187 is a busy, lit scene of Santa handling the Christmas mail, made for people who love a talking-point piece! Build the whole mail room, then give this largest of the three pride of place on a console table or sideboard, against the wall and seen from the front. Keep the table in front clear for its moving parts and gift window, and stand a few Christmas cards in a small tray beside it as a nod to Santa's wish letters. It uses batteries, so there is no cable to hide.

Rolife Reindeer Express DS059 is a cheerful sleigh scene that stays low and wide. After the build, it makes a friendly decoration for a dining table, where guests can still talk across it. It has no lights, so there is no cable to plan around, and a row of flameless tea lights beside it adds the glow. Rest it on a white linen runner for a snowy look, and turn the sleigh window toward the seats.

Add a Christmas Music Box to Your Display
A Christmas music box lets your table sing as well as shine! Choose by where your guests will sit.
Rolife Fireside Music Night AMS03 is a cozy scene of bear musicians around a glowing hearth, played by turning a hand crank. Build the band, then crank them to life on a coffee table, within arm's reach with the crank side toward your guests and room for a hand to turn it! A small plaid mat underneath gives it a fireside feel. It uses batteries, so no cable is needed.

ROKR Angel's Christmas Pyramid AMB01 is an elegant golden pyramid inspired by the German Christmas carousel, with a glowing, turning scene inside. It is for builders who want a more serious project, and once built it makes a true dining table centerpiece! Its footprint is compact and the light shines out from the sides, so guests on both sides can enjoy it while plates still fit. It is USB powered, so run the cable under a gold or cream runner to the end of the table, and keep the area right around it clear for the moving parts.

Style a Gingerbread-Inspired Dessert Table
A dessert table needs a backdrop so the sweets look like they belong in a shop window! Put the taller kit at the back and the smaller one near the front.
Rolife Gingerbread House DG176 is a lit bakery shop that matches the treats you serve, so it works as the backdrop! It suits builders who enjoy a longer project, and once built it turns a dessert table into a shop window. Place it at the back center with the shop front facing guests. It uses batteries, so no cable crosses the table. Put your real cookies on a tiered cake stand beside it, and lay a red and white striped runner in front. Now the sweets have a shop to call home.

Rolife Christmas Candy Stand DS043 is a bright red and green candy shop that brings fun to a sweets table, and it suits both new and experienced builders! Build it, then set it at a front corner near the real sweets, with its front turned toward where guests line up. Its overhead light uses batteries, so there is no cable. Glass jars of candy canes or wrapped sweets on each side echo its gumball machine. Who can resist a candy corner?

Add a Playful Santa Accent to a Small Table
Short on space? These two slim, tall pendulum toys fit narrow spots such as the end of a console or a small side table, and neither needs a battery or a cable!
ROKR Santa on Sleigh MCD05 is a playful Santa swinging behind his reindeer, and it jingles when shaken! Build it, then let it swing on a side table or console end as a lively accent for families and anyone who likes décor that guests can touch. It needs no batteries, since a gentle push sets it moving. Face it toward the room, leave clear space to swing, and keep candles and dishes out of its path. A miniature tree beside it completes the corner. Give it a nudge and let Santa fly!

ROKR Santa on Skis MCD06 is a cheerful skiing Santa whose arms sway as it swings! It is narrower than its partner, so once built it suits the tightest corner of a small console or a shelf beside the table, facing the room. It needs no batteries or cable. Set the two at opposite ends of a console with a greenery garland looping between them, leaving a little space on each side so the swing is not blocked. A small Santa with a big sense of fun.

Make a Statement with a Christmas Gift Factory
ROKR Dream Gift Factory EAB01 is a busy toy workshop and the statement piece of this guide! It is for adults who enjoy a big, patient build, and when it is done it becomes the star of a console table or sideboard, where it faces the room so people can watch the toys travel along the belts. You supply the Type-C cable, so choose a spot near an outlet and run the cable behind it.

A one-touch button can switch the music off while the lights stay on, which is handy once the party goes quiet. Stack a few wrapped parcels at each end to echo the gifts it makes, and keep the front clear for the moving parts. Let the gifts roll!
How to Style Your Finished Christmas Table Decorations
Good Christmas table decorations need room to breathe. Start with a table runner, add a little greenery and a miniature tree or two, then place your build where it can be seen and enjoyed!
- Dining table: Keep it low and central with one compact piece, and let short trees or flameless candles stand at the sides. Keep any cable at the table end so plates, glasses and serving dishes still fit.
- Coffee table: Give your build its own spot with a tray or a small mat, and keep mugs within easy reach.
- Console table: Layer heights, with taller builds at the back and small extras at the ends. Keep it near an outlet if the kit needs one.
- Dessert table: Use cake stands and jars to bring the sweets close to your build, and keep the front edge clear for plates and serving.
Pick your spot, add a few cozy touches and enjoy the result!
FAQs
Which kits work best on a dining table?
Pick a compact piece. The Angel's Christmas Pyramid and the Reindeer Express both have a compact footprint, and the Reindeer Express stays low, so guests can still talk across the table.
Can I use more than one kit on the same table?
Yes! Choose one star piece and add a smaller one beside it, such as a little house next to a bigger scene. Keep the same mood, like cozy or playful, so the table reads as one story, and leave open space around each piece for dishes and moving parts.
How do I leave enough room for dining and serving?
Keep displays to a narrow strip down the middle of the table or at one end, and allow 18 to 24 inches of table width per person, as the Room & Board guide suggests.


Ayesha Atif
A freelance writer driven by timely action and definitive outcomes, favouring bold decisions over the ghosts of "what if" and the weight of hypothetical regrets.
Robotime is a creative lifestyle company dedicated to designing and developing 3D puzzles, toys, and wooden handicrafts. Subscribe to learn more.
Enjoy Robotime building guides and creative inspiration?
Add Robotime as a Preferred Source on Google to see more of our latest stories in Search.
 Add Robotime to your Preferred Sources
Ayesha Atif
A freelance writer driven by timely action and definitive outcomes, favouring bold decisions over the ghosts of "what if" and the weight of hypothetical regrets.
Robotime is a creative lifestyle company dedicated to designing and developing 3D puzzles, toys, and wooden handicrafts. Subscribe to learn more.



Leave a comment
This site is protected by hCaptcha and the hCaptcha Privacy Policy and Terms of Service apply.