


Rowood Wooden Flower Bouquet 3D Puzzle Review
Editor's Note: This is a review post about the Rowood Wooden Flower Bouquet 3D Puzzle, originally posted by @theitalianmakesit on YouTube. We have compiled and summarized the contents mentioned in the video to objectively and impartially review this product for everyone.
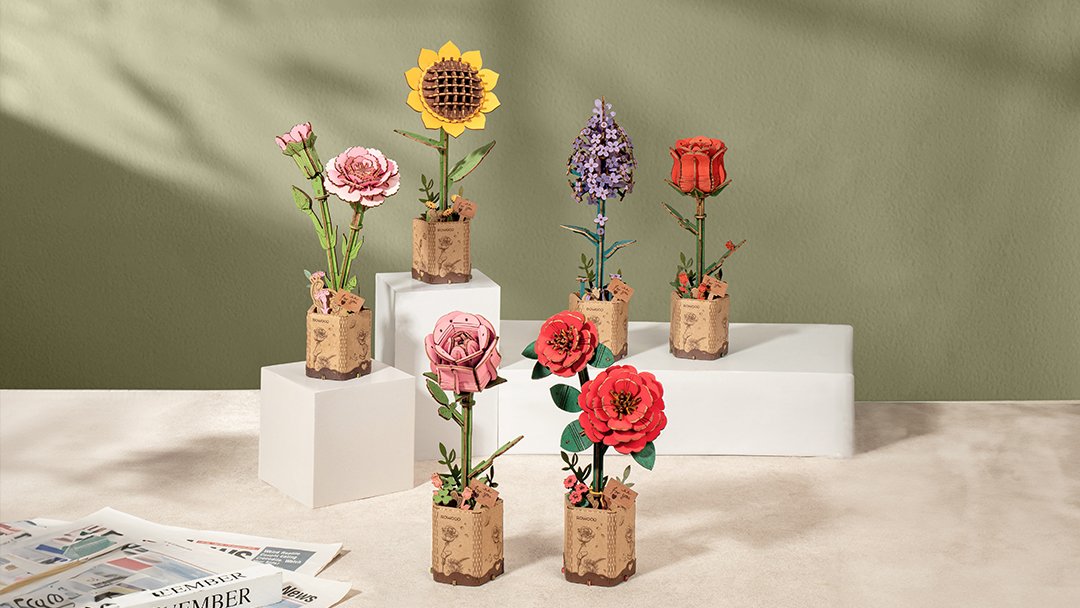
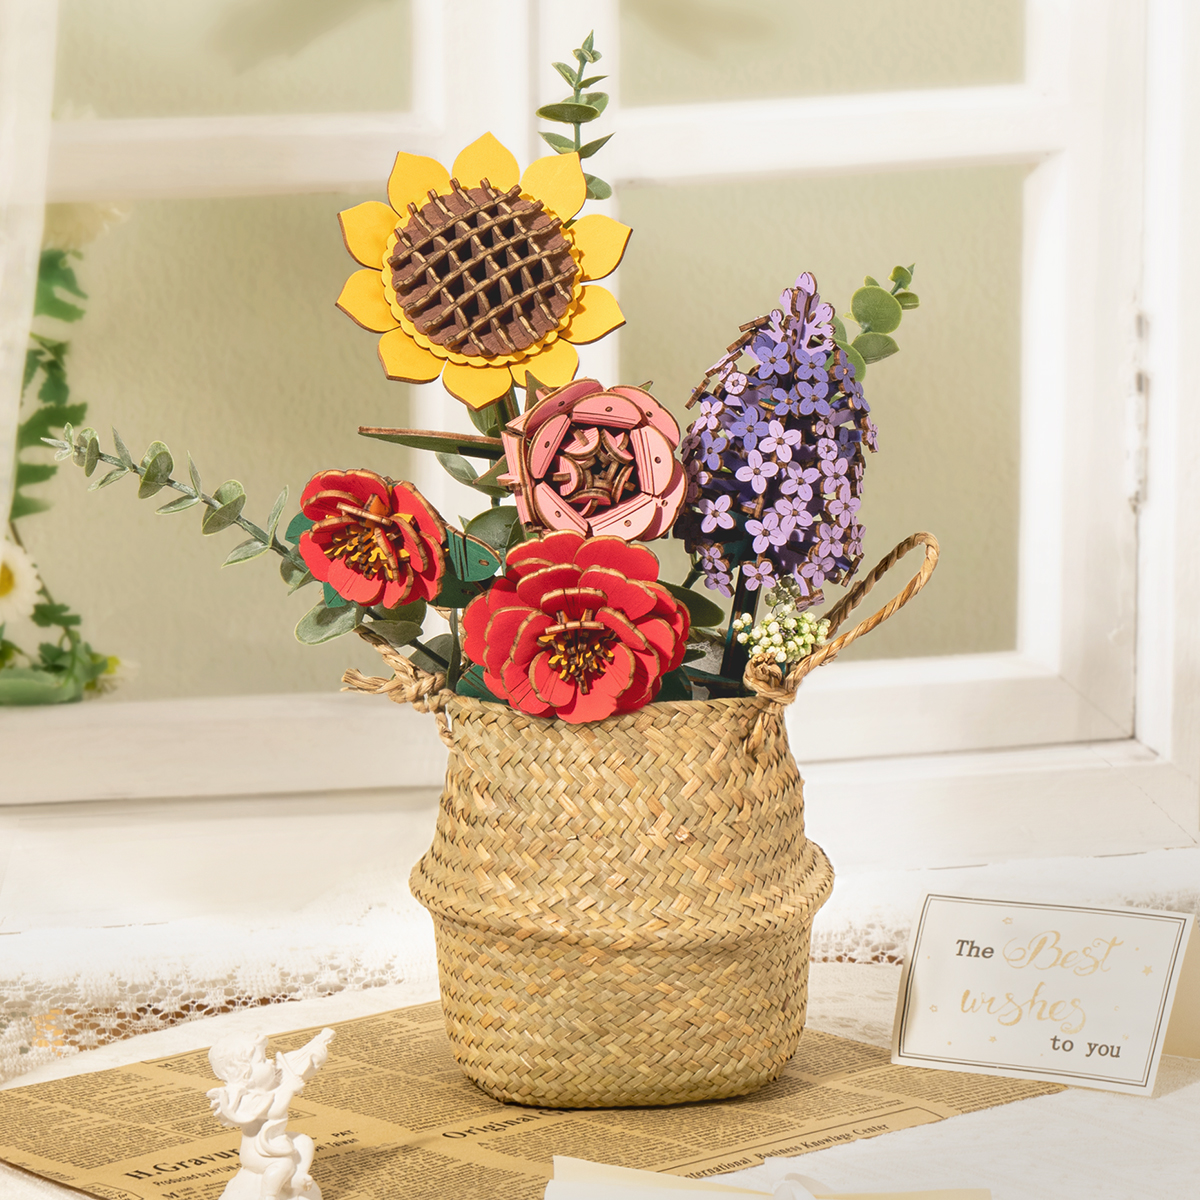
A great, unique gift and long-lasting floral decor, the Rowood Flower Bouquet is a set of four pre-colored flowers that you can display individually or beautifully arrange in your favorite vase. When bought as a set, the bouquet also comes with a eucalyptus to complement the flowers. You can buy more of the sunflower, lilac, red camellia, and pink rose, depending on your desired flower arrangement.
It’s a practical and handmade gift that doesn’t wilt, perfectly preserving the cherished memories and wishes that you want to relay to your loved one. You can also take advantage of the flowers’ symbolism and meaning which you can find below.
- Sunflower- Loyalty, adoration, lasting happiness, long life, and good luck
- Lilac- Confidence, renewal, old love, and wisdom
- Red Camellia- Passion, longing, unyielding love, perseverance, and strength
- Pink Rose- Gratitude, grace, admiration, sweetness, femininity, joy, and elegance
Details
- The whole set contains 581 pieces
- About 3 hours of assembly time
- Difficulty level: ★★★
- Assembled size: H:5.1"(13cm) x W:10.2"(26cm) x D:17.2"(44cm)
- Three wrapping papers and ribbon included
- The bouquet comes with the eucalyptus aside from one of each flower
- Comes with spare parts
- Free international shipping for orders over $65
- 30-day risk-free return policy
- Free parts replacement service
Features
- Pre-colored Parts- No painting is needed because the parts come pre-colored.
- Adjustable Stem Heights- Customize the flowers’ stems to make them fit your desired flower arrangement or chosen vase.
- Adjustable Flower Angles- You can adjust where the flowers face, adding more possibilities to your design.
- Comes with a Blessing Card- Aside from the flowers’ beautiful symbolisms, there’s an engraved heartfelt blessing to express your love.
- Numbered Pieces- Assembly is made easier with numbered pieces so all you need to do is match them with the manual’s visuals. Also, aside from the individual flowers’ assembly, there are instructions on how to wrap the bouquet.
- Different Bouquet Styles- The manual comes with several styles of bouquets that you can follow.
Assembling the Rowood Wooden Flower Bouquet
Here’s a mini guide about the Rowood Wooden Flower Bouquet’s assembly. You can also check their step-by-step tutorial on YouTube. The individual flowers are fairly straightforward to assemble so I’m going to focus on the actual bouquet instead in this review of this beautiful 3D wooden puzzle kit.
Assembly Tips and Review for the Individual Flowers
The individual flowers are easy to assemble but fiddly. The instructions are brilliant which is great since you need to understand them well for smooth assembly. For example, the base of the red camellia comes numbered. So, for all the petals, the instructions tell you which number you’ve got to slot them in.
It goes without saying that the little bits are fragile so you need to be careful when handling them. Though the kit is marketed as requiring no glue, it’s great to arm yourself with some PVA glue just in case you break some parts like I did.
I find it really clever how the base of the individual flowers work. The folds at the top have numbers. There’s a sequence in the way that you’ve got to fold them. So, you just check these numbers and fold them accordingly.
There’s also a cute little sign saying “For You” which I find really adorable.
The flowers look cute individually. But, you can also extend the stems and bunch them up as a bouquet which is what I did.
Assembly Tips and Review for the Bouquet
I did the second method for the bouquet because I didn’t really like the straight line at the top for the other method. I prefer the triangular shape of the folded wrapping paper on the second one.
First, I put together the eucalyptus, and the little bow, and extended the stems of the flowers.
The silver, grayish eucalyptus comes with a small label, where you can apparently write a short message at the back if you’re going to give the bouquet as a gift. The eucalyptus feels flimsy so I had to glue quite a few bits like the stem which kept falling down. They aren’t as snug as they should be. It’s not really an issue though since you can just put some PVA glue. It dries clear so you can’t even see them.
It’s the same for the bow which is a bit delicate. I’m hoping that the little bit of glue that I added will keep it from moving too much. Still, it is really cute. On the other hand, extending the stems of the flowers was really easy since the extenders fit really well.
For the cardboard holder, you just need to squish it a bit and then close the bottom part. For the upper part, just bend the trapezoid parts in and fold the flaps at the top outwards.
Now, for the difficult bit, you need to arrange the flowers and eucalyptus while holding them in place. Don’t forget that you can adjust the angles of the flower heads. It took me several tries to get them where I wanted them to be, after which I just tied them together with the ribbon. Make some adjustments if needed and add the foliage.
Once you’re happy with your arrangement, lay out the white tissue wrapping paper and place the bouquet on top. Fold the tissue wrapping paper and bunch it together towards the bouquet, holding them at the top like I did. Secure it with a piece of ribbon.
Next, lay out the smooth wrapping paper, lighter side up and with one of the corners facing you. Place the bouquet on top and fold the corner of the wrapping paper on top of it. Make a small flap by folding the corner outwards. Then, just fold the sides of the wrapping paper on top of the end part of the bouquet and bunch them in where the bouquet is tied. Tie it up with another piece of ribbon to hold it in place.
After that, you’re supposed to take the other card and put it on top to cover the bottom bit. However, if you’re planning to put the bouquet in a jug like I did, then you can just skip that part. Depending on your vase, jug, or container, you can also skip using the cardboard holder if it’s stable and snug enough.
So, I put the bouquet inside the jug and made a few more tweaks to the arrangement. I wrapped a piece of ribbon around the jug and attached the bow at the center with a glue stick. For the final touches, I put the little butterfly on the sunflower, the bee on the red camellia, and the cute snail on the lilac.
Ta-da, there you have it - Rowood Wooden Flower Bouquet done!
Final Words
Overall, I think this kit is done very well. I have to say that it doesn’t seem as sturdy as the previous Robotime kits that I’ve built. The bits aren’t that snug like with the ROKR Pinball Machine and Amusement Park, but it’s something that a little bit of PVA glue can’t fix.
That said, I still love it and I think it looks really cool. I enjoyed putting it together and would love to do more of this. In fact, if I had space, I’d probably do a whole bouquet of sunflowers, another bouquet full of just red camellias, and so on. How cool would that be? You can have flowers all year round and the colors are stunning. I absolutely love it!


